Do I have a pulley injury?
This guide offers simple, science-backed checks to help you recognize the signs of a pulley injury, understand what’s happening inside your finger, and take the first steps toward safe recovery. I originally put this information together while recovering from a finger injury of my own, and wanted to share it in the hope that others might find it useful.
The advice here is based on the Volker paper “Pulley Injuries in Rock Climbers”, a widely cited resource in the climbing coaching community.
Remember: while these heuristics can help you make an initial assessment, seeing a medical professional is the best way to confirm a diagnosis and plan your rehab.
Right after the injury
If you find yourself needing to stop and wonder whether you’ve injured your fingers, you probably have. Do not continue climbing or pulling on anything — not even a hangboard. Stop and rest immediately to avoid making the injury worse.
Diagnosis
The following are simple heuristics to help you identify what kind of injury you may have sustained. These checks are intentionally surface-level for simplicity, and are deliberately conservative to reduce the risk of underestimating an injury. The only way to be certain is to get a professional medical examination.
Pulley injuries
There are 4 grades of pulley injuries defined in Volker’s paper:
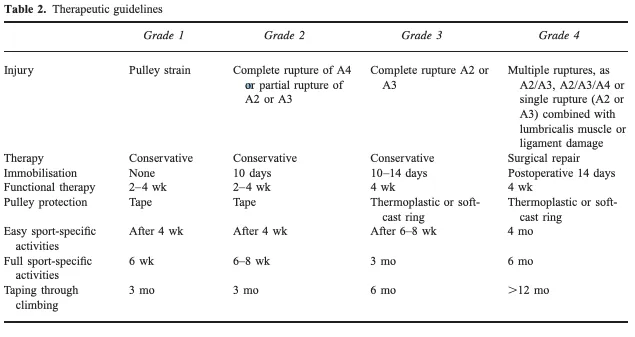
- If you experienced any traumatic “pop”, “crack”, or any sort of sound coming from your finger + accompanied by any sort of pain and followed by a significant decrease in that finger’s strength, then you have most certainly sustained at least a grade 2 pulley injury.
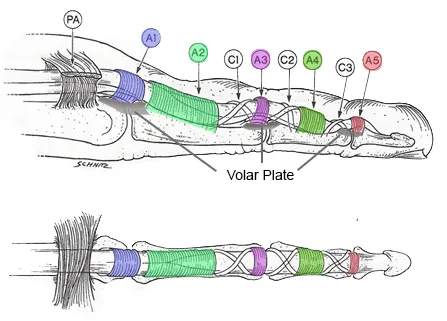
- Apply medium pressure by pressing on each of the regions highlighted in the finger pulley diagram above. If you feel pain coming from any of these regions as you apply pressure, you have at least a grade 1 injury (strain) on that respective pulley.
- Compare the injured finger to the uninjured finger on the other side, if there is any visible swelling at the respective regions, then you probably have at least a grade 1 injury on that respective pulley.
Surgery is basically never required unless you have managed to rupture all of your finger pulleys.
Forearm muscle injuries (FDP and FDS)
If your pulleys are not hurt but you still experience pain/discomfort/weakness when attempting to crimp, then you probably injured either your flexor digitorum profundus (FDP) or flexor digitorum superficialis (FDS). The FDP and FDS control flexion at each of your respective finger joints:
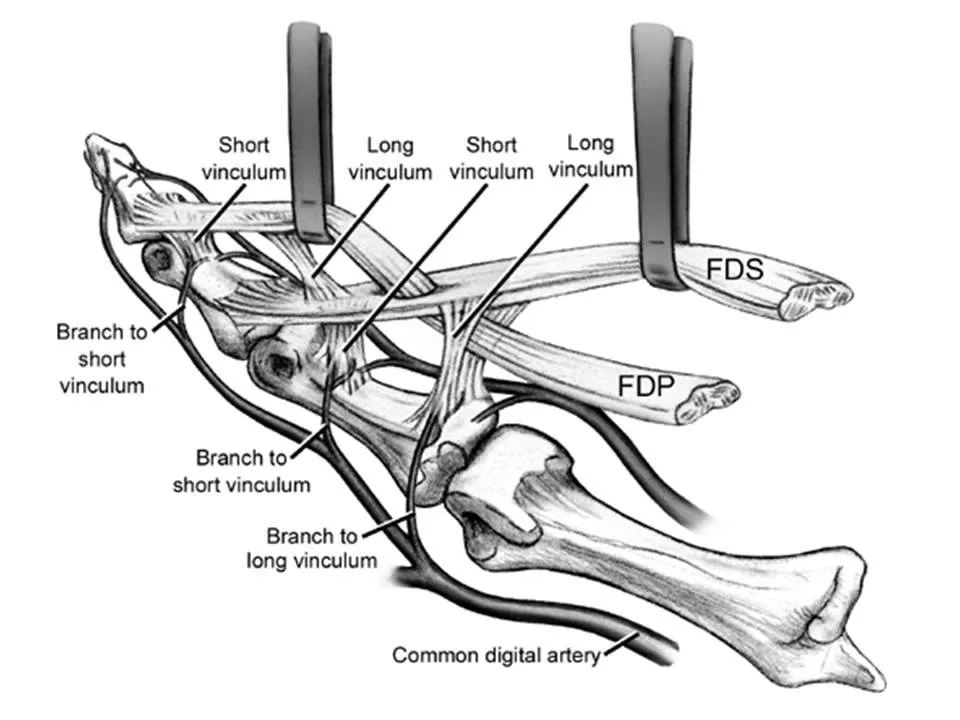
A quick way to test for this is to test flexing and extending the injured finger at each finger joint: hold on to your injured finger with your other hand and attempt to move each finger joint independently. If there is weakness/pain, you have injured the respective forearm muscle.
I will not cover recovery for FDP and FDS injuries as I have no personal experience with these 😅
Pulley injury recovery phases
Below are simplified phases you can start on immediately after sustaining a finger injury.
1. Immobilisation
If you suspect you have at least a grade 2 pulley injury— complete/partial rupture, you need to immobilize the injured finger.
- Means no climbing OR loading your injured finger at all.
- You might want to consider a finger splint to ensure complete immobilization.
- immobilization period varies based on degree of injury, but is at least 10 days.
2. Functional therapy
This phase is crucial for preserving your injured finger’s range of motion. Swelling can last for a while, and without gentle movement, the finger may become stiff. Functional therapy helps maintain mobility, improves circulation, and supports a better recovery.
- Finger glides
- Squeezing an exercise ball
⚠️ Still no climbing or crimping at this point. Focus on how you can maintain your overall climbing fitness without loading the injured finger — for example, work on core strength, mobility, or antagonist training during these weeks.
3. Getting back to climbing
At this point, the injured finger should be healed and strong enough to start pulling on edges.
- Do no-hangs with the open crimp position as much as possible.
- Once you feel comfortable enough, you may ease into easy climbing (Maximum 50% of your current grade)
- 2 x 1hr sessions a week
- H-tape injured finger for support.
4. Resuming normal climbing
At least 2 weeks after easing back into climbing, you might feel strong enough to climb at 100% again.
- Continue to H-tape injured finger for support for at least 3 months.
- H-taping for support doesn’t reduce the risk of re-injury. It doesn’t mean you can push your fingers harder.
- You need to be mindful of your climbing intensity— listen to your body and avoid doing too much too quickly.
- It’s always better to proceed with caution to avoid re-injury.